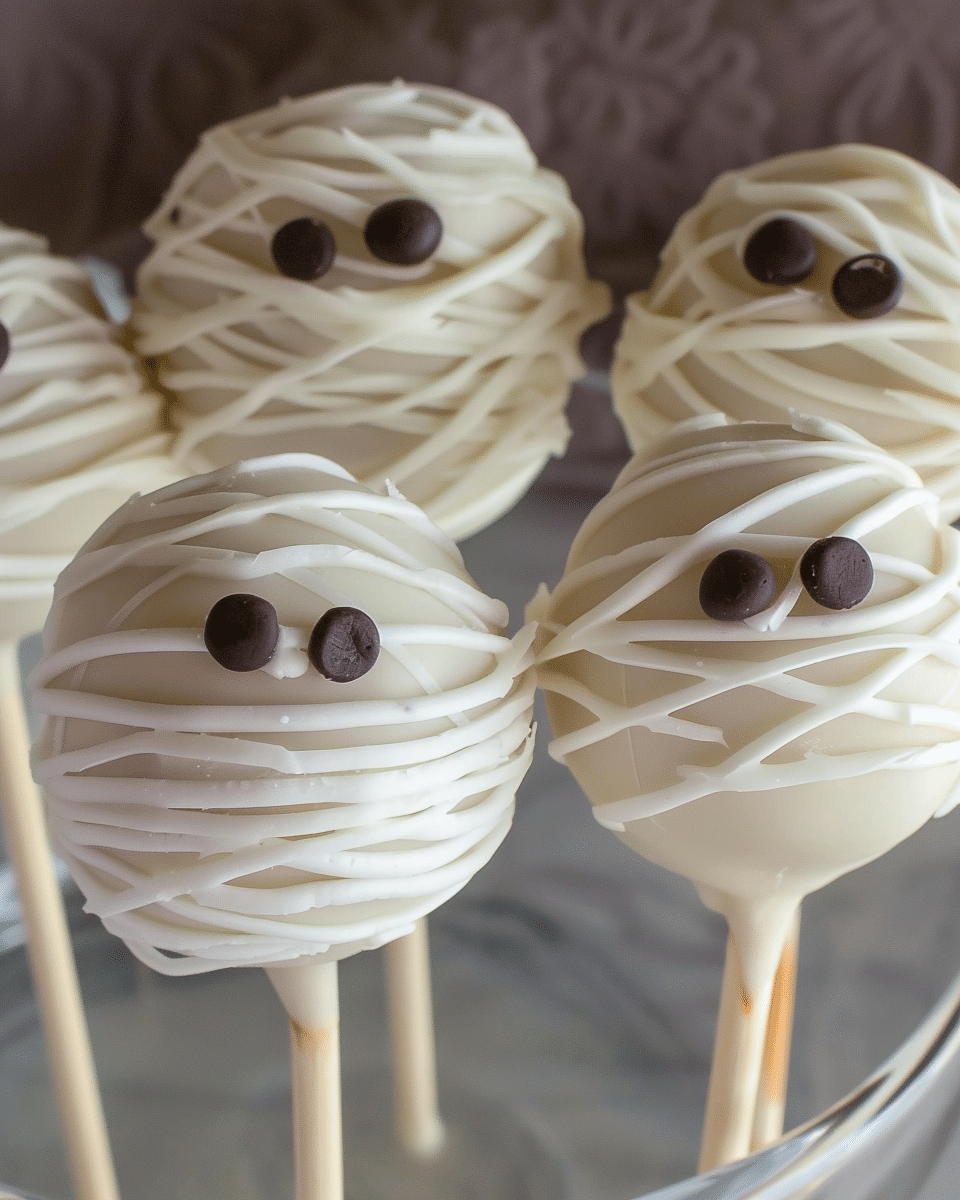
These Halloween mummy cake pops are the perfect spooky-sweet treat for any October celebration. With moist cake centers, a smooth candy coating, and fun mummy designs made from drizzled white chocolate, these cake pops are as fun to make as they are to eat. They’re bite-sized, portable, and kid-approved—ideal for parties, trick-or-treat handouts, or a Halloween-themed dessert tray.
Why You’ll Love This Recipe
I love how cute and creepy these mummy cake pops look while still being incredibly simple to make. I use boxed cake mix and frosting to keep it easy, and the decorating is quick thanks to a simple drizzle technique and candy eyes. They’re fun to make with kids or on my own when I want something festive. Plus, they make exactly 24 pops—perfect for a party batch.
Ingredients
(Here’s a tip: Check out the full list of ingredients and measurements in the recipe card below.)
-
Boxed cake mix (any flavor – I usually use chocolate or red velvet)
-
Eggs, oil, and water (as called for on the cake mix box)
-
Frosting (about ½ cup – store-bought or homemade)
-
White candy melts or white chocolate
-
Candy eyes
-
Cake pop sticks
-
Optional: black food coloring gel for extra detail or facial expressions
Directions
-
I bake the cake according to the box instructions and let it cool completely.
-
I crumble the cooled cake into a large bowl until it resembles fine crumbs.
-
I mix in just enough frosting to bind the crumbs together—I add it gradually and stop once the mixture holds its shape when rolled.
-
I scoop and roll the mixture into 24 evenly sized balls.
-
I chill the cake balls in the fridge for at least 1 hour, or freeze them for 15–20 minutes to firm up.
-
I melt the white candy melts according to the package instructions until smooth.
-
I dip one end of each cake pop stick into the melted candy and insert it halfway into each cake ball. This helps secure the pop.
-
I dip each cake ball fully into the melted candy, letting the excess drip off. I place them upright into a foam block or cake pop stand to set.
-
Once the coating sets, I drizzle extra melted white candy melts over the cake pops in a zig-zag pattern to create mummy bandages.
-
Before the drizzle sets, I gently press on two candy eyes.
-
I let everything set completely before serving or packaging.
Servings and timing
This recipe makes exactly 24 mummy cake pops. It takes about 20 minutes to prep the ingredients, 30 minutes to assemble and decorate, and additional time to chill and set—so I plan for about 1.5 to 2 hours from start to finish.
Variations
-
I sometimes use orange or purple candy melts for a colorful twist on the mummy theme.
-
For a chocolate-mummy version, I use dark or milk chocolate for the coating and drizzle with white for the wrap effect.
-
If I want more detail, I use black gel icing to add tiny mouths or spooky expressions.
-
I’ve also made mini versions by shaping smaller cake balls and using toothpicks instead of full-size sticks.
storage/reheating
I store the finished cake pops in an airtight container at room temperature for up to 3 days or in the fridge for up to 1 week. If I need to keep them longer, I freeze the undipped cake balls and coat them just before serving. I avoid reheating since these are meant to be enjoyed cool or at room temp.
FAQs
Can I make mummy cake pops in advance?
Yes, I usually make the cake balls a day or two ahead and store them in the fridge. I dip and decorate the day of or the night before serving.
What’s the best way to get smooth coating on cake pops?
I make sure the cake balls are chilled but not frozen solid, and I gently tap off excess coating while turning the pop for an even layer.
How do I stop cake pops from falling off the stick?
I dip the stick in candy melt before inserting it into the cake ball, then chill them again before dipping. This helps hold everything together.
Can I use homemade cake and frosting?
Absolutely. I’ve made these with homemade chocolate cake and buttercream, and they turn out just as great—just be sure the texture holds together well.
Do I need a cake pop stand?
It helps, but I’ve used a block of Styrofoam or even an upside-down colander to hold the pops upright while they set.
Conclusion
These Halloween mummy cake pops are spooky, sweet, and a total hit at any Halloween event. I love how simple they are to make, yet they look like I spent hours decorating them. With their soft centers and cute faces, they’re perfect for sharing, gifting, or just treating myself to a little Halloween fun. Whether I make one batch or several, these mummy pops are always a crowd favorite.

Halloween Cake Pops – 24 Mummy Cake Pops
5 Stars 4 Stars 3 Stars 2 Stars 1 Star
No reviews
- Author: Evee
- Total Time: 1 hour 45 minutes
- Yield: 24 cake pops
- Diet: Vegetarian
Description
These Halloween mummy cake pops are spooky, sweet, and perfect for October parties. With moist cake centers, white chocolate bandages, and cute candy eyes, they’re a festive bite-sized treat that’s easy and fun to make.
Ingredients
1 box cake mix (any flavor, e.g., chocolate or red velvet)
Ingredients listed on cake box (eggs, oil, water)
1/2 cup frosting (store-bought or homemade)
12 oz white candy melts or white chocolate chips
48 candy eyes
24 cake pop sticks
Optional: black food coloring gel for decoration
Instructions
- Prepare and bake cake according to box instructions. Let it cool completely.
- Crumble the cooled cake into fine crumbs in a large bowl.
- Mix in frosting gradually until the mixture holds its shape when rolled.
- Form the mixture into 24 equal balls and chill in the fridge for 1 hour or freeze for 15–20 minutes.
- Melt white candy melts according to package directions.
- Dip the tip of each cake pop stick into melted candy and insert halfway into each cake ball. Let set briefly.
- Dip each cake ball into the melted candy, allowing excess to drip off. Place upright in a foam block to set.
- Drizzle remaining melted candy over the coated cake pops in a zigzag pattern to resemble mummy bandages.
- Before drizzle sets, press two candy eyes onto each pop.
- Allow all cake pops to set completely before serving or packaging.
Notes
Use gel food coloring for facial details or colored bandages.
Dark chocolate coating with white drizzle also works for a reverse mummy effect.
Make mini cake pops using smaller portions and toothpicks.
Store finished pops at room temp for 3 days or refrigerate up to 1 week.
Freeze undipped cake balls for up to 1 month; dip before serving.
- Prep Time: 20 minutes
- Cook Time: 25 minutes (cake baking)
- Category: Dessert
- Method: No-Bake (after baking cake)
- Cuisine: American
Nutrition
- Serving Size: 1 cake pop
- Calories: 180
- Sugar: 17g
- Sodium: 140mg
- Fat: 9g
- Saturated Fat: 5g
- Unsaturated Fat: 3g
- Trans Fat: 0g
- Carbohydrates: 24g
- Fiber: 0g
- Protein: 1g
- Cholesterol: 15mg

